#some set stuff
set echo
option quiet
mode one.dim

#the vertical definition
line x loc = 0     spacing = 0.02 tag = top
line x loc = 1.50  spacing = 0.05
line x loc = 5.0   spacing = 0.5
line x loc = 400.0                tag=bottom

#the silicon wafer
region silicon xlo = top xhi = bottom

#set up the exposed surfaces
bound exposed  xlo = top  xhi = top

#calculate the mesh
init boron conc=1.0e14

#the pad oxide
deposit oxide thick=0.075

#the uniform boron implant
implant boron dose=3e14 energy=70 pearson

#plot the initial profile
select z=log10(boron)
plot.1d x.ma=2.0 y.mi=14.0 y.max=20.0

#the diffusion card
method init=1.0e-3 two.d
diffuse time=30 temp=1100 dry

#save the data
structure out=oed.str

#plot the final profile
select z=log10(bor)
plot.1d cle=f axi=f
This example is very similar to Example 1. It starts by setting command line echoing and by instructing SUPREM-IV.GS to be relatively quiet about the progress of computation. The y line section is considerably different. In this example, we wish to calculate the oxidation enhanced diffusion of a boron layer under a growing oxide. Therefore, the vertical specification needs to be different.
#the vertical definition
line x loc = 0     spacing = 0.02 tag = top
line x loc = 1.50  spacing = 0.05
line x loc = 5.0   spacing = 0.5
line x loc = 400.0                tag=bottom
This is similar to the first example. However, we expect the junction to be deeper, therefore the tight grid spacing is maintained out to 1.5 microns. The spacing is increased out to a depth of 5 microns. The backside is placed at the full thickness of the wafer since the defects can travel great distances into the silicon substrate.
The next series of lines define the region, boundary, and initialize the wafer. A starting oxide is deposited and the boron implant is performed. These steps are all identical to Example 1.
The next set of commands choose a plot variable and display it. This plot will be identical to Figure 1 of Example 1.
The diffuse command contains the directive to simulate the 30 minute, 1100C drive-in and anneal.
#the diffusion card
method two.d init=1.0e-3
diffuse time=30 temp=1100 dry
The ambient is dry oxygen. The diffuse command will produce the following output:
estimated first time step -0.000000e+00
Solving         0 +     0.001 =     0.001,     100%, np 80
Solving     0.001 + 0.0028164 = 0.0038164, 281.644%, np 80
Solving 0.0038164 + 0.0176591 = 0.0214756, 627.002%, np 80
Solving 0.0214756 +  0.168429 =  0.189905, 953.779%, np 80
Solving  0.189905 +  0.813906 =   1.00381, 483.233%, np 80
Solving   1.00381 +    2.6438 =   3.64761, 324.828%, np 80
Solving   3.64761 +   6.03434 =   9.68195, 228.245%, np 80
Solving   9.68195 +   9.78821 =   19.4702, 162.208%, np 80
Solving   19.4702 +   14.1452 =   33.6153, 144.512%, np 80
Solving   33.6153 +   19.4714 =   53.0868, 137.654%, np 80
Solving   53.0868 +   26.1378 =   79.2245, 134.236%, np 80
Solving   79.2245 +   35.1156 =    114.34, 134.348%, np 80
Solving    114.34 +   38.3539 =   152.694, 109.222%, np 80
Solving   152.694 +   44.1769 =   196.871, 115.182%, np 80
Solving   196.871 +   63.5629 =   260.434, 143.883%, np 80
Solving   260.434 +   84.4433 =   344.877,  132.85%, np 80
Solving   344.877 +     105.6 =   450.477, 125.054%, np 80
Solving   450.477 +   78.7206 =   529.198,  74.546%, np 80
Solving   529.198 +   71.7795 =   600.977, 91.1826%, np 80
Solving   600.977 +   121.337 =   722.315, 169.042%, np 80
Solving   722.315 +    191.01 =   913.324,  157.42%, np 80
Solving   913.324 +   108.262 =   1021.59, 56.6788%, np 80
Solving   1021.59 +   193.111 =    1214.7, 178.374%, np 80
Solving    1214.7 +   350.262 =   1564.96, 181.378%, np 80
Solving   1564.96 +   235.041 =      1800, 67.1044%, np 81
The first thing to notice, in comparison to Example 1, is that more time steps are needed. This is for two reasons. First, the defects move faster than the boron and they limit the size of the time step initially. At longer times, the defects begin to approach steady state, and the boron diffusion limits the time step. Since the boron diffusivity is enhanced by the injection of interstitials, the time steps have to be smaller than in Example 1 to resolve the faster changes in the boron.
The next step is to save the data for further examination.
#save the data
structure out=boron.str
This saves the data in the file boron.str. This file can be read in using the initialize command or the structure command.
The following script will plot the final boron concentration.
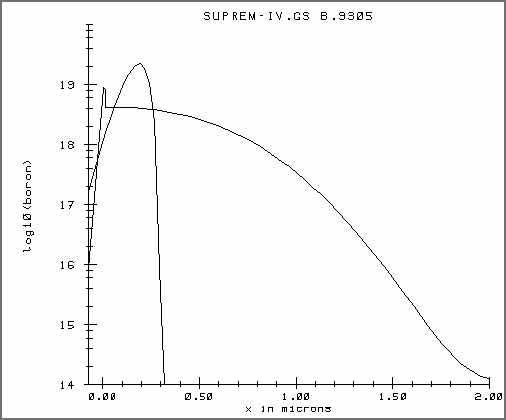
#plot the final profile
select z=log10(bor)
plot.1d cle=f axi=f
The first command picks the log base ten of the boron concentration to plot. The plot will be placed on the earlier plot. The "cle=f axi=f" instructs SUPREM-IV.GS to not clear and not compute new axes.
The profile in Figure 1 shows a deeper junction as expected, as well as segregation into the oxide. The spike at the surface indicates that the surface oxide concentration is about 20 times larger than the silicon surface concentration.